
Ways to get your survey in front of respondents: the survey link, test links, QR codes, and embeds.
Where to find it: Surveys → open your survey → Distribute tab. The Distribute tab sits in the builder's tab strip in the top toolbar, to the right of Settings, and it is the last tab in the strip. The page is headed Distribute Survey.
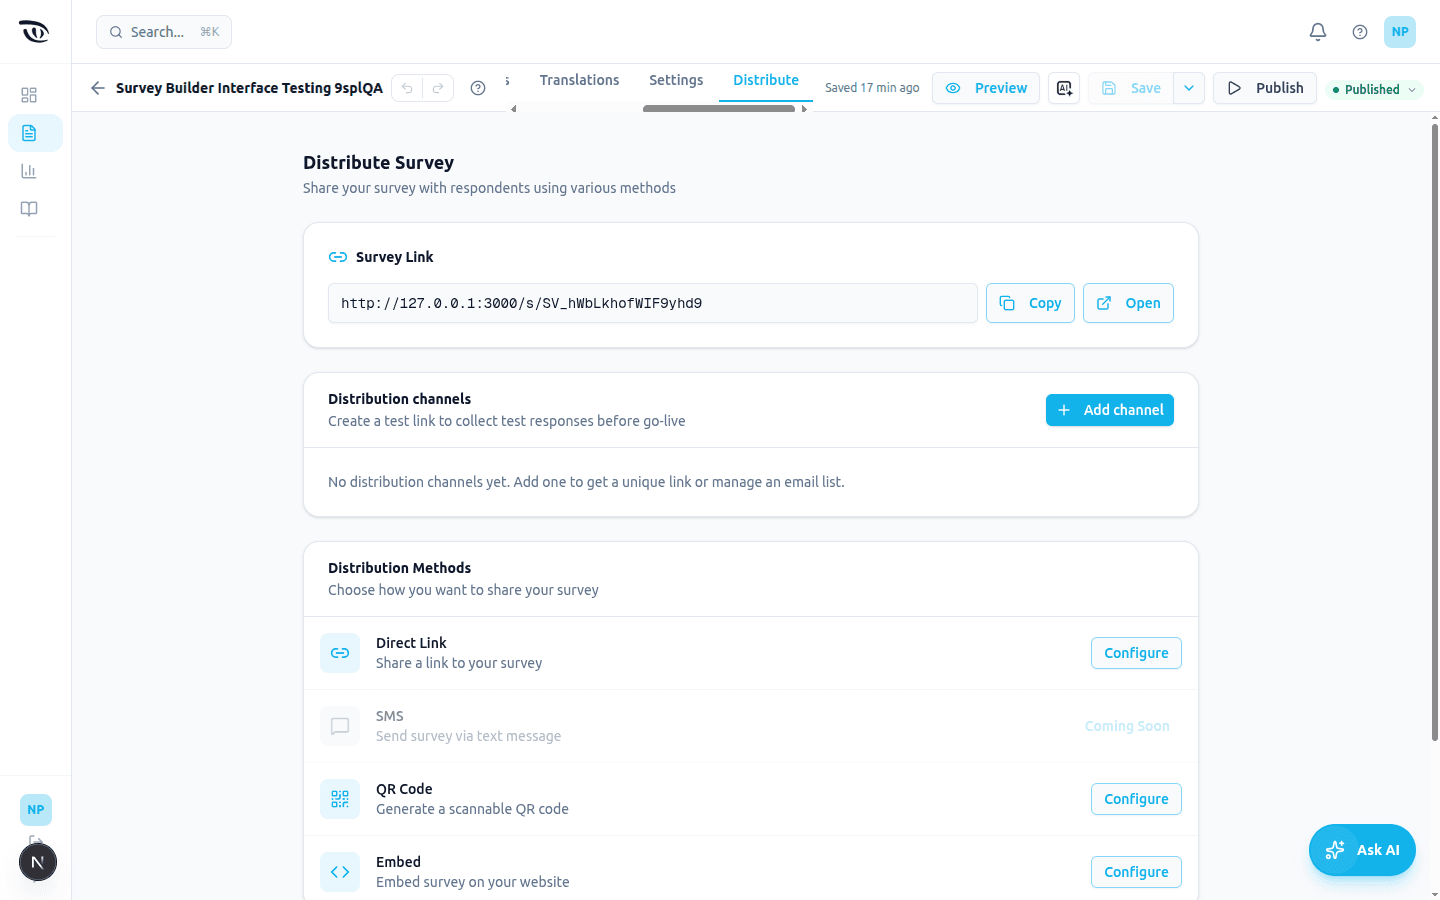
Publish first. Draft surveys are not accessible to respondents: until a survey has been published once, its link opens a "Survey Not Found" page. So until then every control that hands the link out is disabled: Copy and Open on the Survey Link card, Configure on Direct Link, QR Code and Embed, and all four Quick Share buttons. Hovering one explains why: "Publish the project to share its link." The Survey Link card shows the note "Note: This link works once the project is published. Publish it to copy, open or share the link." They switch on as soon as you publish, and stay on if you later close or pause the survey, because its link then shows respondents that the survey is closed rather than "Survey Not Found".
What is on the Distribute tab#
The tab is four stacked cards, top to bottom:
| Card | What it is for |
|---|---|
| Survey Link | The real link you field. Copy it or open it in a new tab. |
| Test Link | Extra links (and email lists) whose responses are kept as test data. |
| Distribution Methods | Per-channel setup dialogs: Direct Link, Email, SMS, QR Code, Embed. |
| Quick Share | One-click hand-off to Email, Slack, Twitter/X or LinkedIn. |
Survey link vs. test links#
There are two kinds of links, and they behave differently:
| Link | Where to find it | Responses go to |
|---|---|---|
| Survey Link | The Survey Link card at the top of the tab | Total Responses (your real, live data) |
| Test Link | The Test Link card below it | Test Responses (kept separate; see below) |
Use the Survey Link for real fielding, and a Test Link to try your survey end-to-end without polluting your live data.
The Survey Link card has two buttons next to the address (both disabled until the survey is published; see Publish first above):
- Copy puts the link on your clipboard. The button briefly reads Copied afterwards.
- Open opens the survey in a new browser tab.
Test links#
The Test Link card creates extra links for a survey. Every response collected through a test link is recorded as a test response, kept apart from your real data so you can validate logic, branching, quotas, and the respondent experience before go-live. The Add Test Link dialog says the same thing: "Responses collected through this link are kept under 'Test responses'."
A test link can be used again and again. The Allow multiple submissions setting applies only to the Survey Link. Even when it is off, the same tester can open and complete a test link as many times as they need, and test responses never count against the Survey Link.
Publish before you can add one. The Add Link button is disabled until the survey is published, and hovering it explains why: "Publish the survey to create a test link." Before you add your first one the card reads "No test link yet." The button is also hidden once the survey already has one test link, unless your organisation allows more than one.
Add Test Link#
Click Add Link to open the Add Test Link dialog.
| Field | What it does |
|---|---|
| Type | Link or Email list. This choice only appears when email lists are enabled for your organisation. |
| Name | What the link is called in the list. Required. Create stays disabled until you type one. |
| Email addresses (one per line) | Only on an Email list. Paste or type one address per line. |
Create saves it, Cancel closes without saving. A new link appears in the list straight away.
Managing test links#
Each row in the list shows the name, the link's address (or, for an email list, "Email list" with the number of addresses), and a live count of responses. On the right:
- A copy button (two-squares icon) copies that link's address to the clipboard. It confirms with "Link copied" and is shown for link rows only.
- Edit list opens the email list editor. Shown for email-list rows only.
- The pencil button opens Rename Test Link: change the Name, then Save.
- The trash button opens Delete Test Link, which asks "Its link will stop working. Collected responses are not deleted." Confirm with Delete.
The email list editor is titled Email list followed by the link's name, and holds one box labelled "One email per line (paste from spreadsheet or type)". Save list stores it.
Working on the same survey with others: channels are not locked while someone else has the survey open. An open Distribute tab refreshes its list every few seconds and whenever you return to the window, so a channel a teammate adds, renames or deletes appears without reloading. If two people rename the same channel at the same moment, the last save wins.
Test responses#
Responses from test links appear under Analytics → Test Responses. Each row has the same actions as the main Total Responses view:
- View response opens the full response details (answers, status, metadata).
- Exclude response moves the response to Excluded, where Include response puts it back and Delete forever removes it for good.
Bulk actions are available above the list:
- Exclude all excludes every test response at once. The confirmation says "You can include them again from the Excluded tab. Real responses are not affected."
- Purge all permanently deletes every test response for this survey. The confirmation warns that the data "cannot be recovered", and again that real responses are not affected.
Excluding a test response lowers the response count shown next to its test link. Test responses live in their own view and do not appear in Total Responses.
Distribution Methods#
The Distribution Methods card lists the ways a survey can reach a respondent. Each row has a Configure button that opens a small dialog; every one of those dialogs closes with Done.
| Method | Row description | Status |
|---|---|---|
| Direct Link | Share a link to your survey | Available |
| Send survey invitations via email | Shown only when email lists are enabled for you | |
| SMS | Send survey via text message | Not built yet. The button reads Coming Soon |
| QR Code | Generate a scannable QR code | Available |
| Embed | Embed survey on your website | Available |
The SMS row is greyed out and its button cannot be clicked. Until the survey is published, Configure is also disabled on Direct Link, QR Code and Embed, since all three hand out the survey link; the Email row stays available.
Configure Direct Link#
The simplest dialog. It shows one read-only field, Survey URL, with a copy button beside it, and the reminder that "Anyone with this link can access and respond to your survey."
This is the same address as the Survey Link card, so there is nothing to set up. The dialog exists so the link is reachable from the methods list as well. Treat the link as public: there is no per-person token on it, so anyone you send it to can forward it, and anyone who receives it can answer.
Configure Email Distribution#
This dialog does not send anything by itself. It has two blocks:
- Email Settings points you back up the page to create email lists on a test link.
- Features lists what email lists give you: manage multiple email lists, track responses by email list, and personalised invitations if those are configured for your organisation.
So the working part of email distribution is the Email list type in the Add Test Link dialog. Create the list there, paste your addresses, and the responses it collects are tracked against that list. The Email method only appears at all when email lists are enabled for your organisation, so if you do not see the row, that is why.
Configure QR Code#
Opens a dialog with a live QR code for your survey, sized for reading on screen. Below it the dialog suggests where QR codes earn their keep: printed materials and posters, event attendance, and in-store surveys.
Download PNG saves the image as survey-qr.png, ready to drop into a poster, a table tent, or packaging artwork.
A few things worth knowing before you send artwork to print:
- The code encodes the same Survey Link address as the top of the tab. It does not carry any tracking, so scans are not distinguishable from clicks.
- Because the address is fixed, a printed code keeps working for the life of the survey, but it also cannot be pointed somewhere else once it is printed.
- Print it large enough and with quiet space around it. A phone camera needs a clean, high-contrast image.
The same QR code and Download PNG button are also available from the publish dialog, under QR Code.
Configure Embed#
Puts the survey inside a page on your own website, in an iframe.
The dialog gives you two settings and then writes the code for you:
| Setting | What to put in it |
|---|---|
| Width | A CSS width. Defaults to 100%; the hint suggests "100% or 800px". |
| Height (px) | A height in pixels. Defaults to 600. |
Under Copy this code to your website: the dialog shows the finished snippet, which updates as you change the width and height. The copy button in its corner puts it on your clipboard, and a message confirms "Embed code copied". Paste it into your page's HTML where you want the survey to appear.
Two gotchas:
- Pick a generous height. The iframe does not grow with the survey, so a page with a long question will scroll inside the frame. If your survey has one long page, raise the height rather than letting respondents scroll twice.
- Your site has to allow the frame. If your website sets a content security policy, it must permit the survey's origin, or the frame stays blank.
Quick Share#
The Quick Share card shares the survey link without leaving the builder:
- Email opens a new message in your mail program, pre-filled with the subject "Survey Invitation" and the link in the body.
- Slack copies the link and tells you to paste it into Slack. It does not post anything for you.
- Twitter/X opens a compose window with the link and the text "Please take my survey".
- LinkedIn opens LinkedIn's share window with the link.
All four share the Survey Link, not a test link, so all four are disabled until the survey is published.
Panel redirects#
For panel-integrated studies, configure outcome URLs per termination type (complete, screenout, quota return, quality control). On redirect, the platform automatically appends the panel's URL parameter (for example transaction_id) with the respondent's value, so you don't add the key yourself. A leftover blank &transaction_id= is filled with the respondent's value automatically, but a hard-coded non-empty value (e.g. &transaction_id=OLD) is respected and passed through as-is, so don't put a fixed value there. The parameter does not need to be the last one in the URL, and existing query parameters are preserved.
To also capture the panel value onto the response, create a survey variable with Source = URL Parameter. See Variables & Panel Redirects for the full guide to variable sources and capturing transaction_id.
Related guides#
Was this page helpful?