
Built on Conjoint. Online Choice shows respondents an online store's product list, one list per screen, and asks them to buy one product from each list, or to buy nothing. It stores its answers and exports them like a Conjoint question; what changes is the respondent screen, a fixed set of attributes, and a design that is built for each respondent, so there is no matrix to lock, no design to generate or upload, and no DOE library to activate. It works the same way as Shelf Choice, with an online store in place of a store shelf.
What respondents see#
- Your question text, above a list of products (5 per screen by default).
- Each product card shows, from top to bottom: a Sponsored line (on the first product of every screen only, as plain grey words or as a ribbon or tag badge — see Sponsorship badge styles), the product title and "by" manufacturer, the price with the price per unit (for example
($0.29 per ounce)), and then the product image next to the shipping message, the star rating, the number of reviews, a dashed coupon box when a promotion applies, and an Add To Cart button. A discounted price appears in orange with the original price struck through. - Clicking a product's image or its Add To Cart button opens a Buy window: a large image, the same price as the card, the shipping message, a quantity list (
1 item,2 items, …), the coupon, the stars and reviews, and a repeat box such as "Subscribe & Save: repeat this order every month" that the respondent can tick. Buy records the purchase and moves to the next screen. Tap to close goes back to the list without buying. - Under the last product there is a full-width Next (Buy None Of These) button. It records the screen with nothing bought and moves to the next screen, just as Buy does.
- Between screens, Next Items Loading... shows for a moment and the page scrolls back to the top.
- After the last screen the survey moves on by itself; there is no Next button to click.
Every screen must be answered, but "answered" includes buying nothing: the respondent either buys one product or clicks Next (Buy None Of These).
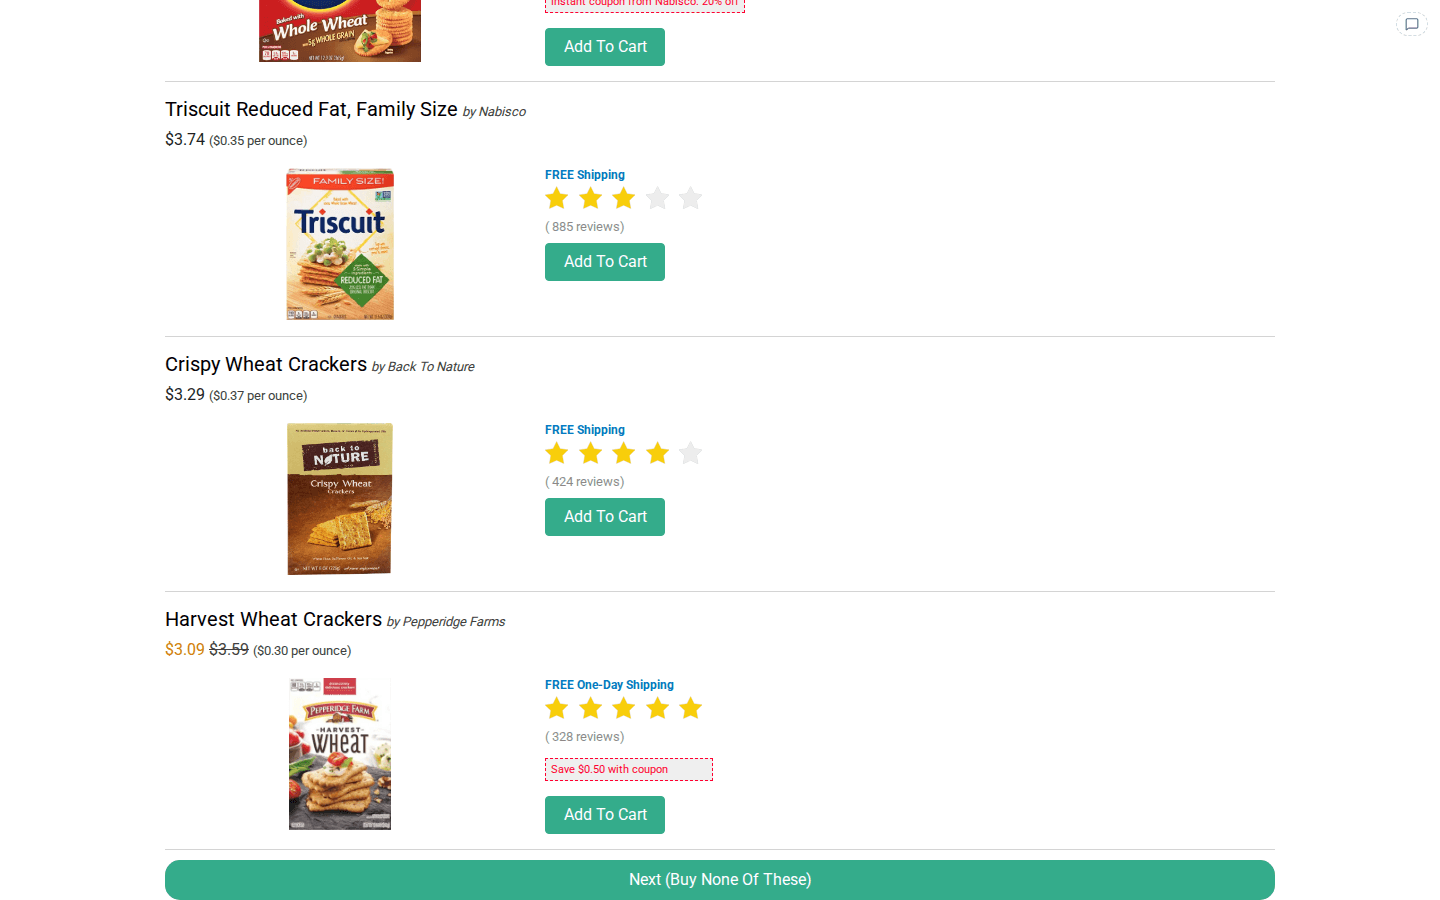
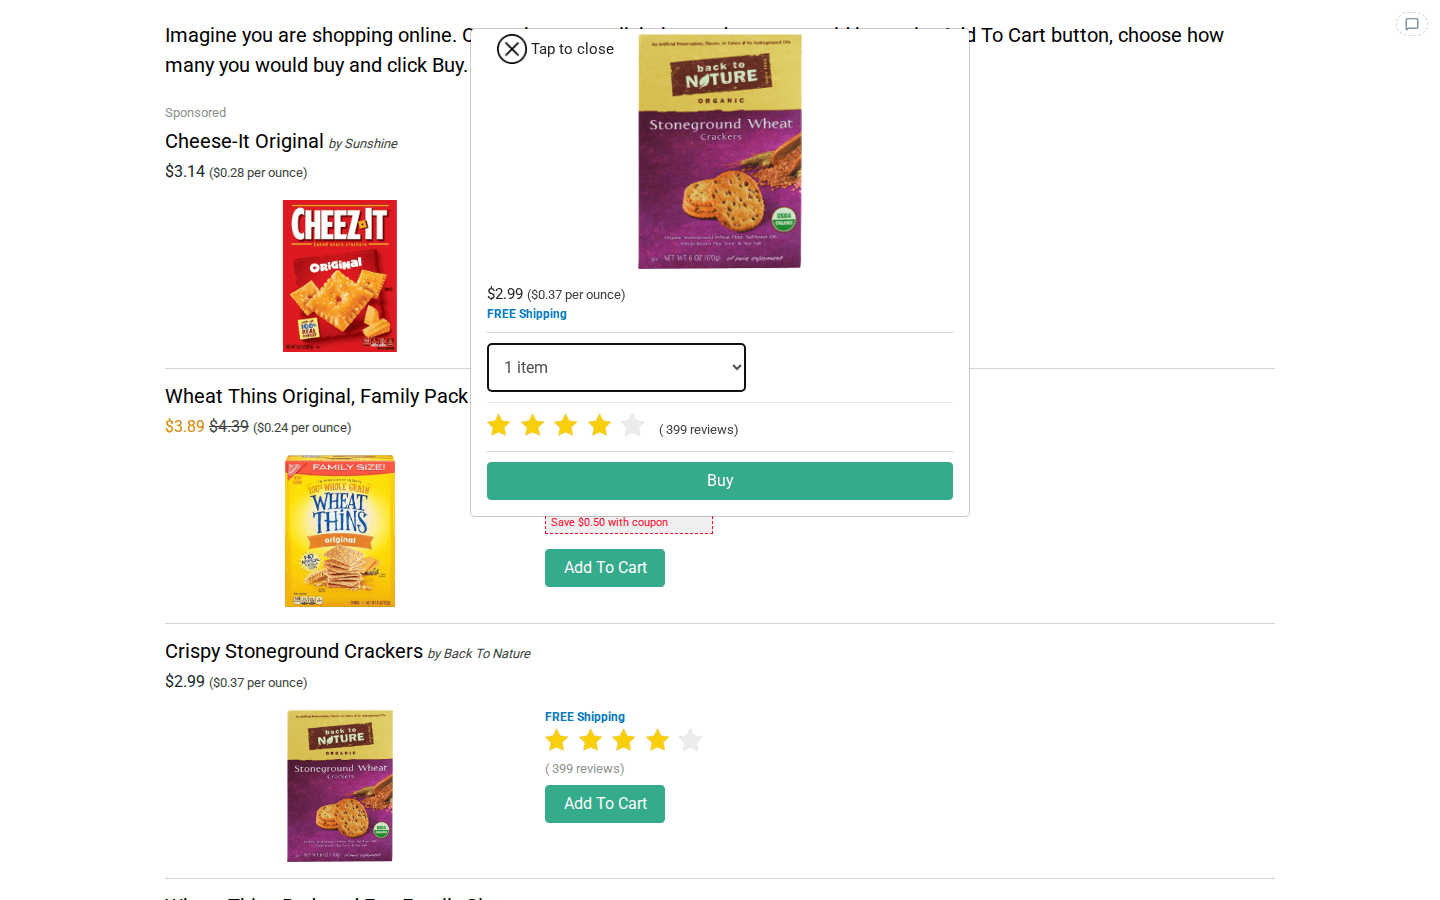
The Add To Cart, Buy and Next (Buy None Of These) buttons use your survey's theme colour.
When to use it#
- E-commerce studies where price, promotions, shipping, ratings and sponsored placement compete on a product listing.
- Price and promotion tests that need purchase quantity and repeat-purchase intent, not just a single pick.
Configuring it in the builder#
Add Online Choice from the Choice Modeling group of the question palette. It sits right after Simplified Shelf Choice.
Attributes#
Every Online Choice question has the same nine attributes. You can't add, remove, rename or reorder them, and their type is fixed, so there is no attribute type or subtype to choose. You edit their levels, and you can drag levels to reorder them:
| Attribute | What a level holds |
|---|---|
| Product | Product title, product image, base price, and the product fields: manufacturer, unit price (the base price per unit), rating (0-5) and review count |
| Price % adjustment | A fraction such as -0.1 (10% off) or 0.1 (10% more) |
| Price $ adjustment | A dollar change such as -0.50. Only a negative value changes the price |
| Promotion | The coupon text, plus promotion % (such as -0.2 for 20% off) and promotion $ (such as -0.5). Write <MANUFACTURER> in the text to show the product's manufacturer there. A level whose text starts with None means no promotion |
| Shipping message | The shipping line, such as FREE Shipping. None shows nothing |
| Repeat message | The label of the repeat box in the Buy window. None hides the box |
| Rating adjustment | Stars added to the product's rating, such as -0.5 or 0.5 |
| Review count adjustment | Reviews added to the product's review count, such as 250 |
| Sponsorship | The sponsored line, plus its badge style. The first level is the sponsored label and always goes on the first product of each screen; the other products get one of the other levels. None shows nothing. Sponsorship needs at least two levels |
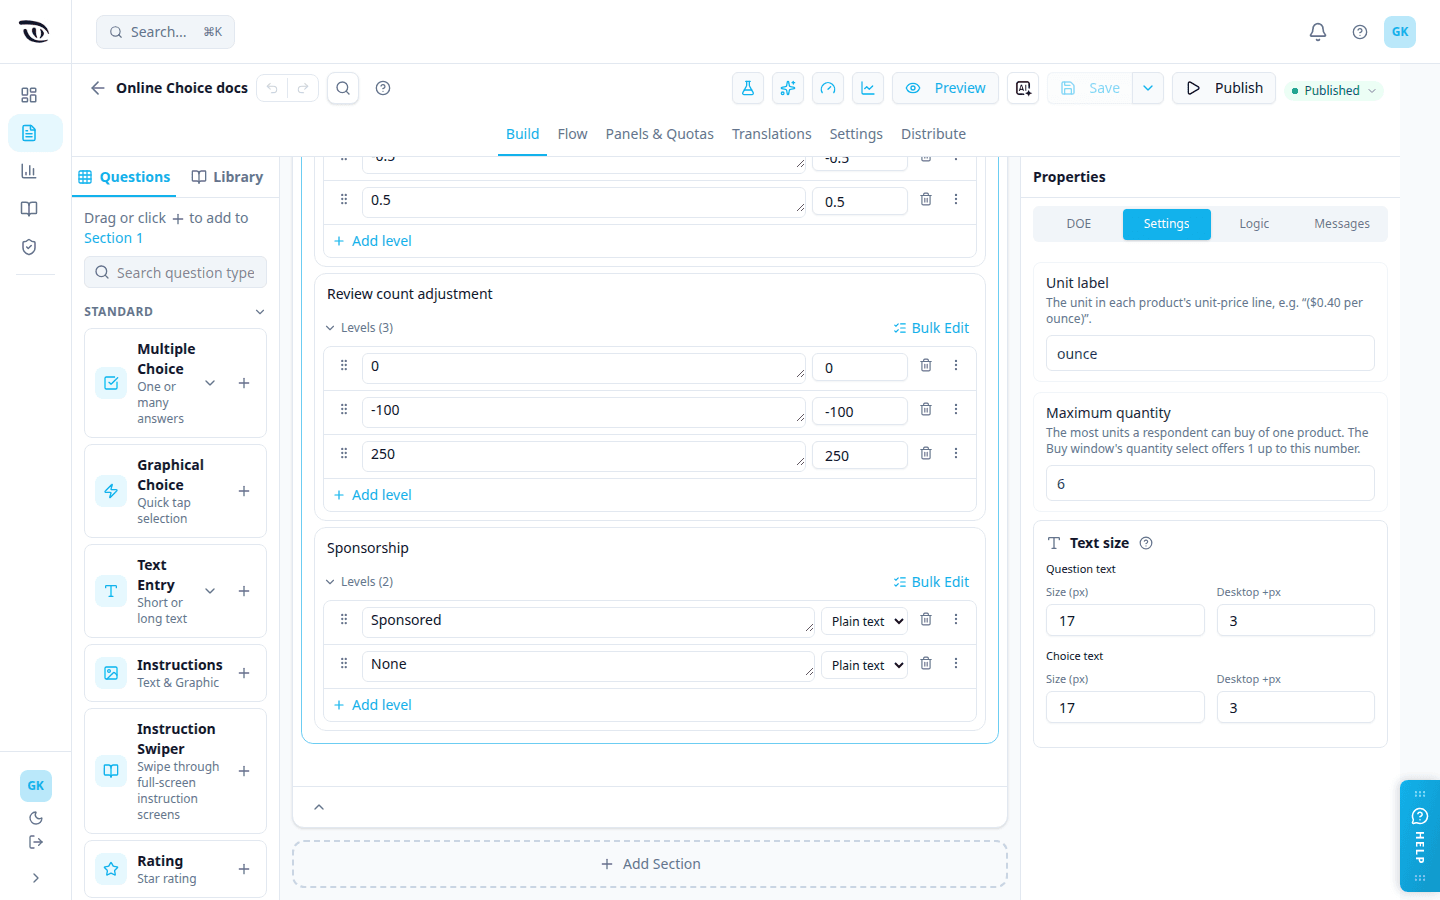
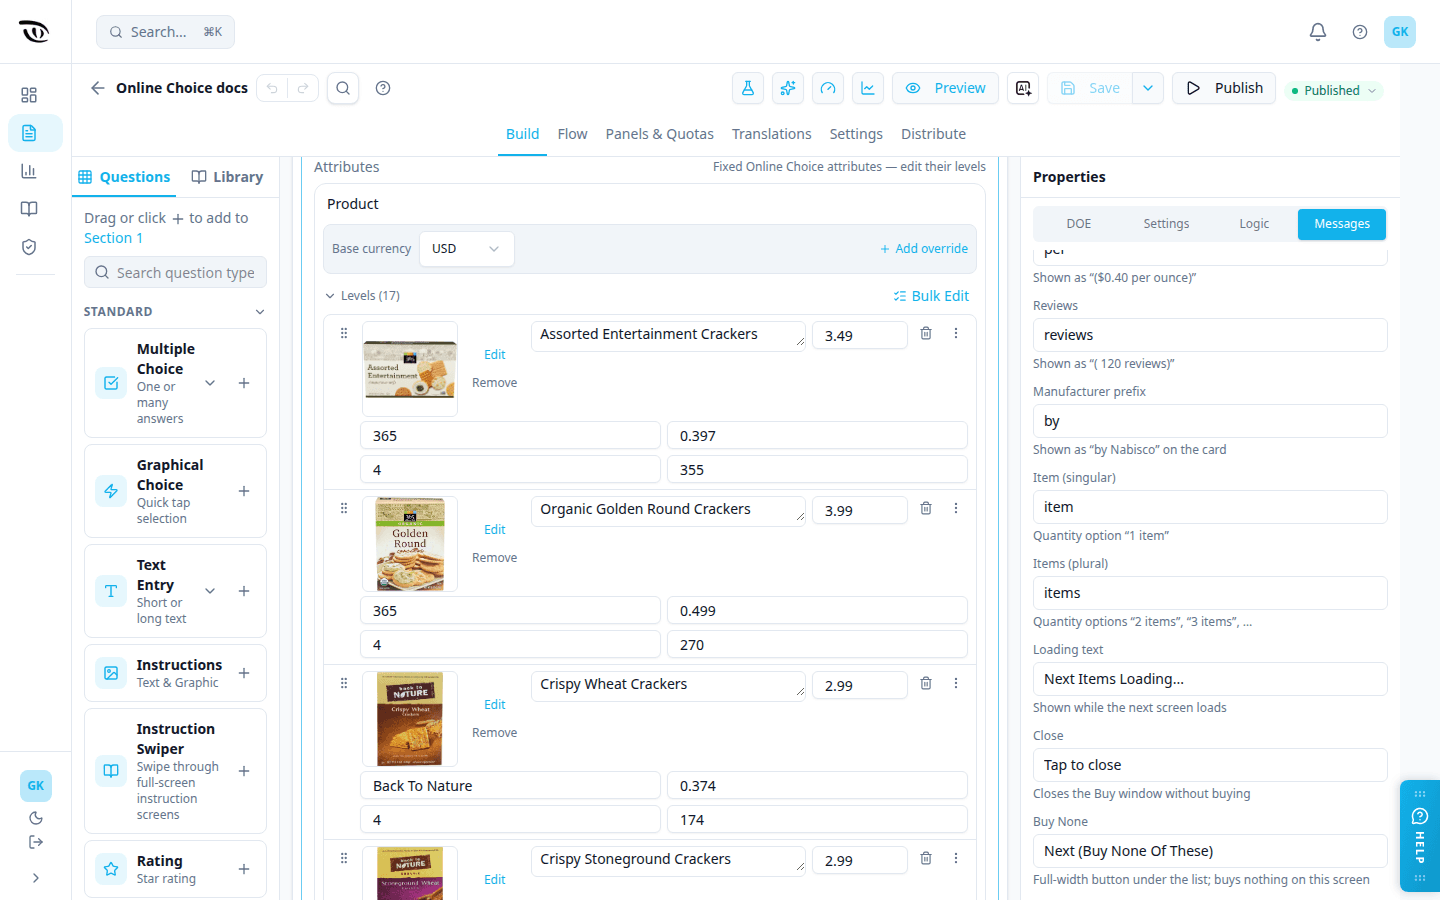
Level text is plain text: there is no formatting toolbar, but you can still pipe in an earlier answer. There are no level tooltips, and the question card has no Help instructions field.
Sponsorship badge styles#
Sponsorship is the one attribute whose line can be styled. Next to each Sponsorship level's text is a small badge style box with three ready-made looks. You type the words you want to show — Sponsored, Best Seller, Amazon's Choice, whatever suits the study — and pick how they are painted:
| Badge style | What the respondent sees |
|---|---|
| Plain text | Small grey words above the product title. This is the default, and what every Sponsorship level looked like before badge styles existed |
| Ribbon | Your words in white on an orange ribbon with a notched edge, the way a "Best Seller" flag looks on a shopping site |
| Tag | Your words in white on a small black rounded tag, the way an "Amazon's Choice" tag looks |
Three things to know:
- The style is set per level, so one Sponsorship attribute can offer a plain line, a ribbon and a tag at once, and the design will spread them across products.
- A level whose text is
Noneshows nothing at all, whatever style is picked on it. - There is no way to type your own HTML or colours here, and no formatting toolbar — the three styles are the choice.
A new question comes with 17 sample cracker products (such as Ritz Crackers by Nabisco and Almond Nut Thins by Blue Diamond, with images, unit prices, ratings and review counts) and sample levels for every other attribute. Every adjustment attribute has a 0 or None level: if you don't use an attribute, keep only that level. Replace the sample products with your own.
You need at least as many products as products per screen, so no product appears twice on one screen.
How the price is worked out#
- Start from the product's base price.
- If the Price $ adjustment is negative, apply it. If the Price % adjustment is not 0, it is applied to the base price instead of the Price $ adjustment.
- If the product has a promotion (its text doesn't start with
None), apply its promotion %, or, when that is 0, its promotion $. The coupon box shows the promotion text, and the price appears in orange with the pre-promotion price struck through.
The price per unit follows the price when a promotion applies. When no promotion applies, the price per unit shown is the product's own unit price, even if a price adjustment changed the price; this matches the original Qualtrics Online Choice.
The star rating is the product's rating plus the rating adjustment, shown in half-star steps. The review count is the product's review count plus the review count adjustment.
The currency is the Product attribute's currency, as in Conjoint. Currency overrides on the Product attribute work as they do in Conjoint: the first override whose condition matches is used, otherwise the base currency.
Properties tabs#
| Tab | What's there |
|---|---|
| DOE | Number of screens (default 2) and Products per screen (default 5) |
| Settings | Unit label (default "ounce", as in "per ounce"), Maximum quantity (default 6, up to 20), and text size |
| Logic | Display and skip logic, as for other questions |
| Messages | Every button and label text: Add To Cart, Buy, the "per" in the unit price, reviews, the "by" before the manufacturer, item / items in the quantity list, the loading text, Tap to close, and the Buy None button label. A field you clear goes back to its default, shown greyed in the box. The texts are English by default; for another language, type your own text into each field |
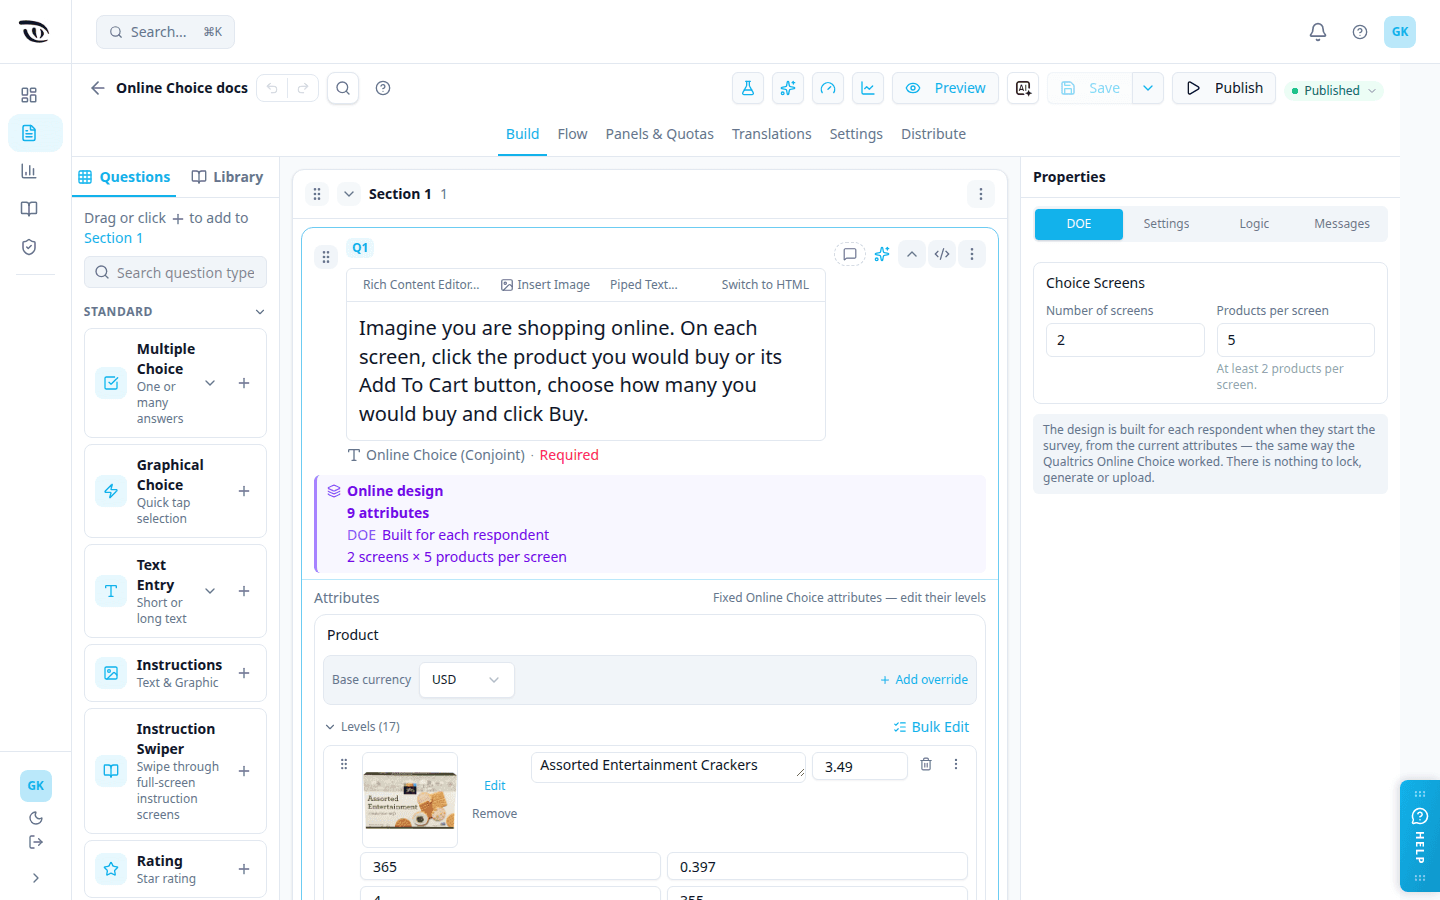
There is no Stimulus tab (the product list is the layout) and no Validation tab: every screen must be answered, by buying a product or by clicking Next (Buy None Of These).
Text size covers two things: the question text above the list, and the product titles and Buy-window texts.
The design is built for each respondent#
Online Choice builds its design the way the original Qualtrics Online Choice did: when a respondent starts the survey, a design is built for them from the question's current attributes. Products are spread across the screens without repeating on a screen, the other attributes' levels are balanced, and the sponsored label always goes on the first product of each screen.
So, unlike Conjoint, there is nothing to set up for the design: no matrix lock, no generating or uploading a design, no DOE libraries, and no constraints, overlap mode, number of designs, seed, presentation order, design assignment or Split across the flow settings. An Online Choice question can't be paused and resumed later in the survey.
Publishing#
Publish the survey as soon as the question is set up. There is no lock, generate or activate step. Publishing is refused only if the question can't build a design, for example when it has fewer products than products per screen, or when Sponsorship has only one level.
You can keep editing the attributes after the survey is live. Changes apply to respondents who start after you publish them; a respondent already in the survey keeps the design they started with. If you remove a level after responses came in, the earlier responses that saw it still refer to it, as with any other question.
Data and exports#
Each screen records which product was bought, the quantity, whether the repeat box was ticked, and the price shown for every product on the screen. A screen where the respondent clicked Next (Buy None Of These) is recorded as answered with nothing bought: every product on it has quantity 0 and no repeat.
One respondent's screens in Excel#
To see one respondent's purchases, open the response from the Responses tab of the Fielding dashboard (click View) and click Export Response. On a survey with an Online Choice question this downloads an Excel file (.xlsx) instead of the usual CSV. Surveys without Online Choice or Shelf Choice still download the CSV.
Every Online Choice question in the response detail carries an i beside its question text. Click it for a short legend of that question's 14 fields, without leaving the page. Only Online Choice and Shelf Choice questions have one, and each explains its own question — so a response with two of them shows two icons.
The Excel file has these sheets:
| Sheet | What's on it |
|---|---|
| Response | The same row the CSV gives: both header rows and this respondent's answers, one column per question |
| Online Choice | One row per product shown to this respondent. If the survey has several Online Choice questions, each gets its own sheet named Online - followed by the question's tag, such as Online - Q3. A survey that also has Shelf Choice gets its Shelf sheets too |
The Online Choice sheet has these columns:
| Column | Contents |
|---|---|
RespondentID | The respondent |
DesignId | The design built for this respondent |
ScreenIndex | The screen number, in the order the respondent saw the screens |
PositionIndex | The product's place in that screen's list, starting at 1 |
Selected | 1 for the product the respondent bought, otherwise 0 |
One column per attribute, followed by its label column | The attribute column holds the level number (1 = the attribute's first level). The label column (Product label, Price % adjustment label, …, Sponsorship label) holds the level as readable text, such as the product title or FREE Shipping. The label is empty for a level you have since removed from the question |
Quantity | Units bought of this product (0 when not bought) |
Repeat | 1 when the respondent ticked the repeat box when buying this product, otherwise 0 |
FinalPrice | The price the respondent saw, after adjustments and promotions |
BuyNone | 1 on every row of a screen where the respondent clicked Next (Buy None Of These), otherwise 0 |
Response JSON | The Online Choice answer exactly as it appears in the CSV and on the Response sheet (see Reading the export) |
To keep the sheet easy to read, RespondentID, DesignId and Response JSON are merged into one cell down all of the respondent's rows, and ScreenIndex and BuyNone are merged down the rows of each screen. A screen the respondent never reached is left out — a Buy None screen keeps its rows, with zeros. If the respondent answered no screen, the sheet has its header row only.
Reading the export#
In the main response export — Export All at the top of the Fielding dashboard, Export Data on the Responses tab, and the Response sheet of the single-response download, which all write the same thing — the Online Choice question is one column. It uses the same layout as the Qualtrics Online Choice onlineChoiceScreenItems data: a list with one entry per product shown, such as ["1 | 1 | 3 | 1 | 0 | 2 | 1 | 0 | 2 | 1 | 0 | 0 | 0 | 0", …]. Each entry has 14 fields separated by | (a space, a pipe and a space):
screen | position | product | price % | price $ | promotion | shipping | repeat message | rating adjustment | review count adjustment | sponsorship | bought | quantity | repeat
- screen and position start at 1 and follow what the respondent saw: the screen number and the product's place in that screen's list.
- The nine attribute fields are the level's position in that attribute's level list, counting from 0, so the first level is
0. A field is empty if the level has since been removed from the question. - bought, quantity and repeat are
1, the quantity, and1or0(repeat box ticked or not) for the product bought, and0,0and0for every other product. On a screen answered with Next (Buy None Of These) all three are0on every entry.
A screen the respondent never answered has no entries; a Buy None screen does have entries, all zero. The same format is used in values and labels mode and in every file format.
A respondent who leaves and comes back starts again at the first screen, with the same design.
Related guides#
- Conjoint (Choice-Based Trade-Off) — the question type Online Choice is built on
- Shelf Choice — the store-shelf version of the same idea
- Question Types — overview and when-to-use table
- Custom Interfaces — the other plugin question formats
- Platform Feature List — plugin inventory and status
Was this page helpful?