
The Survey Builder is where you design your survey — add questions, organize them into sections, configure settings, and preview the final result before going live.
Opening the builder#
From the Surveys page, click on any survey card to open it. You'll land on the Build tab, which is the main editing workspace.
What you'll see#
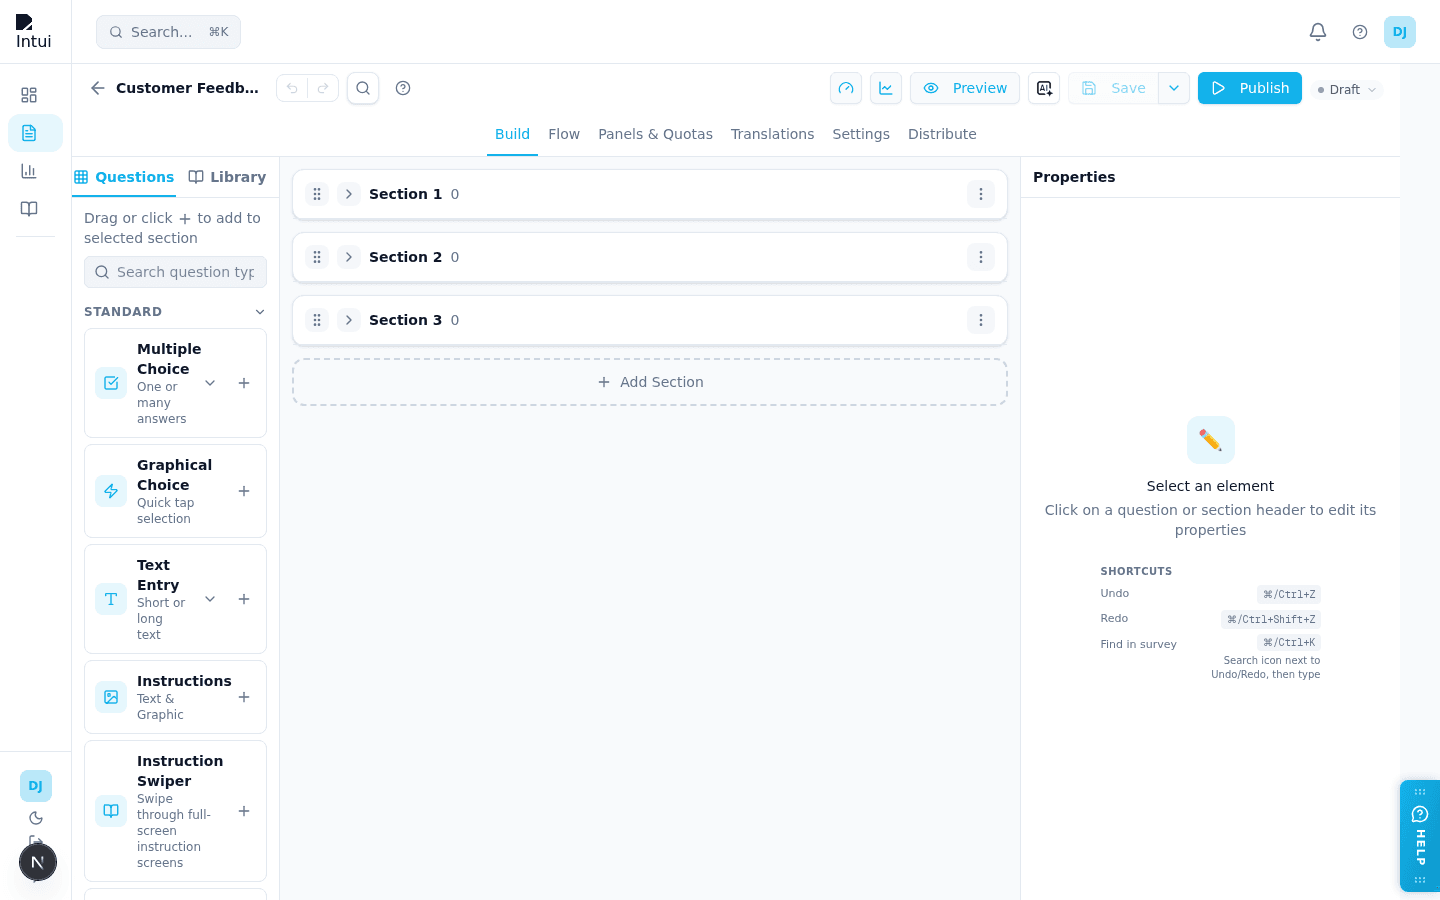
The builder is divided into four areas:
1. Top toolbar#
The toolbar at the top gives you quick access to the most important actions.
Where the tabs are: the builder's tab strip — Build, Flow, Panels & Quotas, Translations, Settings, Distribute — sits in this same top toolbar, centred across it, with the active tab underlined. On a narrow window the strip drops onto its own row directly beneath the toolbar buttons. This strip is how you move between the builder's workspaces, so any instruction that starts with a tab name — for example Survey builder → Distribute tab — starts here. See Builder tabs for what each one holds.
The toolbar buttons themselves:
- Save — Saves your current work as a new version. You can always go back to previous versions later. The builder also autosaves silently after 20 seconds of inactivity, and a small status icon next to the survey title confirms when your latest version was stored.
- Publish — Makes your survey live so respondents can start taking it. The Publish dialog itself now has a two-tab Share Link / QR Code quick-share panel, so you can grab the public link or download a QR PNG without leaving the builder. For the full distribution surface (email, social, embeds, trackable channels), use the Distribute tab.
- AI Edit — Opens a side panel where you can ask AI to improve or modify your survey.
- Preview — Opens a full preview so you can experience the survey exactly as a respondent would.
- Undo / Redo — Step backward or forward through your recent changes.
- Find in survey — Search question text and configuration from the toolbar, or press Ctrl+K (Windows/Linux) / Cmd+K (Mac). Jump straight to a matching question on the canvas.
- Export as QSF — Download a Qualtrics-compatible
.qsffile (see Qualtrics QSF Import & Export).
2. Question palette (left side)#
On the left you'll find a list of all available question types — single choice, multiple choice, rating, NPS, matrix, and more. To add a question, simply drag it from the palette onto your survey canvas, or use the "Add question" button inside a section.
3. Survey canvas (center)#
The center area is your main workspace. Here you'll see your sections (groups of questions) and the questions inside each one.
Things you can do on the canvas:
- Add a section — Click the "Add section" button to create a new group.
- Add a question — Drag from the palette or click "Add question" inside a section.
- Select a question — Click any question to open its settings in the properties panel on the right.
- Duplicate a question — Use the duplicate button on a question card to create a copy.
- Delete a question or section — Use the context menu (three-dot icon) to remove items.
4. Properties panel (right side)#
When you select a question, the right panel shows all the settings for that question — its title, answer options, logic rules, images, and more. This is where you fine-tune each question.
Deleting and restoring a survey#
Deleting a survey does not destroy it. It moves to Trash, and every response it collected stays with it.
Deleting#
From the Surveys page, open the three-dot menu on a survey card and choose Delete, or select several cards and use Delete on the selection toolbar. The confirmation tells you the survey is moving to Trash rather than being removed permanently.
Restoring#
Click the Trash tab in the status filter row at the top of the Surveys page — alongside All, Published, Draft, Paused and Closed. The badge shows how many surveys are in there.
Open a trashed survey's three-dot menu and choose Restore. The survey returns to the list in the state it was in when you deleted it: a paused survey comes back paused, a draft comes back a draft. All of its responses, versions, quotas and distribution links come back with it.
You can also select several trashed surveys and use Restore on the selection toolbar.
What happens while a survey is in Trash#
- It does not appear in the survey list, search results, folders, or analytics.
- Its public link stops working — respondents who open it see a "not found" page, and no new responses can be submitted. Anyone already part-way through a session can finish it, and their answers are kept.
- The card is not clickable, and its status cannot be changed. Editing, duplicating, sharing, previewing, analytics and export are all unavailable — the only actions are Restore and Delete permanently.
- Nothing expires: a survey stays in Trash until you restore or permanently delete it.
Deleting permanently#
From the Trash tab, a survey's three-dot menu also offers Delete permanently. This removes the survey and every response it holds for good.
This cannot be undone. There is no second Trash and no backup to restore from — once confirmed, the data is gone. The confirmation dialog says so explicitly, and you can only reach this action from Trash, so a survey can never be destroyed in a single step.
For audit purposes the platform records who performed the permanent deletion, when, the survey's name, and how many responses were destroyed. That record is kept after the survey itself is gone.
Note: a trashed survey is also removed from HM Admin. Restoring it in Survey Builder re-syncs it back automatically, which can take a moment to appear there.
If a survey is missing from HM Admin#
The re-sync after a restore runs in the background, so it can fail — most often because the sync service is temporarily unreachable. When that happens the survey is back in Survey Builder but HM Admin has not been told, so it will not appear in Project Management and its analytics and fielding screens cannot open.
To fix it, open the survey's three-dot menu in the surveys list and choose Re-sync to HM Admin. It is safe to run more than once. A survey that has never been published has nothing to sync, and the action will say so.
Working with sections#
Sections are like chapters in your survey. Use them to group related questions together — for example, "About You", "Product Feedback", and "Final Thoughts".
For each section you can:
- Rename it to something meaningful.
- Preview just that section using the section menu.
- Save it to the library so you can reuse it in other surveys.
- Set up a loop to repeat the section with different items (for example, asking the same questions about multiple products).
- Delete it if it's no longer needed.
Editing questions#
Changing the title and description#
Click a question to select it, then edit the title in the properties panel. Changes appear immediately on the canvas.
Managing answer options#
For choice-based questions (single choice, multiple choice, etc.), the properties panel lets you:
- Add new answer options.
- Remove options you don't need.
- Edit the text of any option.
Formatting answer text#
If you need bold, italic, links, or lists in your answer options, click the rich text icon next to any answer. A small editor will open where you can apply formatting, then save or cancel.
Adding images to answers#
Many question types let you attach an image to each answer option. The builder uses the same image management experience everywhere — question text, answer options, matrix rows/columns, and ranking/distribution items all share the same image thumb control:
- Click the image icon next to an answer/item/row to open the Image insert dialog.
- Paste an existing URL, or pick from images you've already added (the dialog remembers the current URL so you can replace rather than retype).
- A thumbnail preview appears inline so you can confirm it looks right.
- Click the thumb again to swap or remove the image.
For matrix questions, you can add images and formatted text to both rows and columns. Choice-based canvas cards and the matrix preview now use the same refreshed thumb layout.
One editor, everywhere#
Whether you're editing a question's title, an answer option, a ranking item, a matrix row, or a description — you get the same toolbar with:
- Rich-text formatting (bold, italic, lists, links).
- Piped-text insertion (answers from earlier questions, global variables, loop tokens).
- A "View HTML" mode if you need raw control.
That means the skills you learn editing a question title transfer directly to editing answer text, ranking items, or matrix rows.
Internal IDs (QID, SID, AID)#
Every element in your survey is automatically assigned a stable internal ID when it's created:
- Questions get a QID —
QID1,QID2,QID3, and so on. - Sections get a SID —
SID1,SID2,SID3, and so on. - Answer options get an AID —
AID1,AID2,AID3, and so on.
These IDs are permanent. They never change — even if you rename the question, move it to a different section, reorder your survey, or rename the visible question number (like Q1 or Q2).
Why this matters#
When you use piping to insert a previous answer into a later question, the system uses the stable QID to find the right question. This means you can freely rename your question tags (Q1 → Demographics1, etc.) without breaking any piped text references.
Internal ID vs. question number#
| Internal ID | Question number | |
|---|---|---|
| Example | QID1 | Q1 |
| Can be changed | No — permanent once created | Yes — editable in properties |
| Used for | Piped text, data export, internal references | Display label in the builder |
| Visible to respondents | No | Depends on survey settings |
You don't need to manage internal IDs manually — they are assigned automatically and work behind the scenes.
Previewing your survey#
At any time, click Preview in the toolbar to see your survey as a respondent would. The preview respects all your logic rules, styling settings, and flow — so what you see is what respondents will get.
You can also preview a single section from its context menu if you want to focus on one part.
Saving and publishing#
- Save commits your current work. Each save creates a version, so you can always look back at what changed over time.
- Autosave — After 20 seconds of inactivity following an edit, the builder will save your work automatically in the background. You don't need to do anything — just keep editing, step away, and your changes are preserved.
- Version history lets you view and restore previous versions of your survey.
- Publish pushes your latest saved version live. Only published surveys accept responses — so you can save and tweak as much as you like before going live.
What the Publish dialog tells you#
The dialog reports what the attempt actually did, and it only shows the success screen with your share link and QR code when a new version really went live.
- Published — a new version was created and is now live. This is the screen with the link, the QR tab, and the share options.
- Nothing to publish — the survey is already live and there is nothing new to send. Your survey keeps collecting responses on the version already published. If you expected changes to go out, close the dialog, check the status icon next to the survey title, save, and publish again.
- Not published — something stopped the publish, and the dialog names it. The most common reasons are a validation check on a conjoint or matrix question, or a network failure. Nothing was changed; fix what it names and publish again.
Previously the dialog showed the success screen in all three cases, which is why a publish could look like it had gone out when nothing had. If you were working around that by publishing twice, you no longer need to.
How autosave works#
- The builder watches for edits on the canvas, properties panel, settings, and every other editor surface.
- Any time you make a change, a 20-second idle timer starts. Each new edit resets the timer.
- When the timer runs out with no new edits, your survey is saved silently — no popups, no toasts interrupting you.
- If you hit Save manually (or press Ctrl+S / Cmd+S) during the countdown, the pending autosave is cancelled and your manual save takes over.
- Autosaves create the same kind of version snapshot as manual saves, so every autosave is restorable from Version History.
- If an autosave fails (for example, a network drop), you'll see an error toast and the builder will try again on your next edit — nothing is lost from the canvas.
Knowing what's saved#
The toolbar always tells you the current state of your work, with a small status icon next to the survey title:
- Amber dot — You have unsaved changes. An autosave is scheduled.
- Spinner — A save is currently in flight.
- Green check mark — Your latest change has just been saved.
For the timing of each saved version, open Version History from the arrow next to the Save button — every manual save and autosave is listed there with its timestamp.
An edit you make while a save or publish is running stays unsaved. The builder compares your work against what it actually sent, so anything you typed after the request went out keeps the amber dot, keeps Save enabled, and is picked up by the next autosave. The same holds while the builder is refreshing the survey's status in the background, for example just after publishing. If the toolbar says saved, your latest change is in a version.
Builder tabs#
All of these live in the tab strip in the top toolbar (see What you'll see), so the path to any of them is Surveys → open your survey → tab name. Beyond the Build tab, the builder includes:
| Tab | Purpose | Guide |
|---|---|---|
| Flow | Visual survey path, branches, loops, randomizers | Flow Editor |
| Panels & Quotas | Quota rules and public dashboards | Analytics & Responses |
| Translations | Multi-language content | Multi-Language Surveys |
| Settings | Branding, security, scheduling, experience | Branding & Survey Settings |
| Distribute | Links, QR, embed, channels | Distributions & Sharing Links |
Tip: Use Preview from the toolbar to test the full respondent path before publishing.
Quotas in Survey Builder#
Quotas are configured from Logic → Quotas.
Default behavior#
- New surveys start with no quotas by default.
- New surveys also start with no quota groups and no cross-quotas.
What you can configure#
- Add Quota — Create a quota rule with a name, limit, action, and condition(s).
- Add Group — Group related quotas and control multiple-match handling.
- Action type — Choose what happens when the quota is full: terminate, redirect, close the survey, block new sessions, or track only.
- Over-quota behavior — Keep or delete over-quota responses.
- Reset and manual count updates — Reset a quota counter to zero, or set the count directly. Both are stored permanently and survive publishing, and later completes are added on top of the number you set. See Quotas and Quota Groups.
- Public dashboard links — Mark groups public and copy a shareable dashboard URL.
Public quota dashboard#
When a group is public, dashboard URLs follow:
/q/{surveyId}/{groupId}
This dashboard shows live counts, fill percentages, and CSV export.
Controlling how answers are rendered#
Many question types (single choice, multiple choice, ranking, distribution, fast select, tap-and-drag rank) support attaching images to their answer options. When an answer has both text and an image, the Answers Display control in the Settings tab lets you choose what respondents see:
- Text only — Show just the label.
- Images only — Show just the image.
- Both (default) — Show image and text together.
This is a single setting shared across every question type that supports it, so you can quickly convert an image-grid into a text list or vice versa without re-editing every answer.
Note: Matrix and plugin interfaces (fast select, tap & drag rank, directional swipe) that have their own display modes render them inside their own settings section — the global Answers Display toggle is hidden for those to avoid duplicates.
Working with the library#
The builder integrates tightly with the Library so you can save and reuse questions, sections, and entire surveys.
Saving to the library#
Any question or section can be saved to the library from its context menu. In the Save-to-Library dialog:
- The Title is always saved as plain text, so rich-text formatting (bold, HTML tags) in your question title won't leak into the library name.
- Tags — An info tooltip next to the Tags field explains how tags help teammates find content later. Add a few short tags like
demographics,screener, orNPS. - Items you save appear in the library with their rich-text titles rendered (so bold, italics, and links survive), making browsing feel natural.
Adding from the library#
The library palette lives next to the standard question palette. Drag any library question or block onto your canvas. When you drop a block, its child questions automatically get fresh, unique question tags (Q-numbers) and section tags (B-numbers) so nothing collides with questions already in your survey.
Survey list: folders and "Updated" timestamps#
The Surveys page (your main project list) has a few details worth calling out:
- Folder-scoped counts — When you click a folder in the sidebar, the status counts at the top (Draft, Active, Closed, etc.) recalculate to show only surveys in that folder. The selected folder is reflected in the URL, so you can bookmark or share a link to a specific folder view.
- "Updated" timestamps — The last-updated column now prefixes times with "Updated" (for example, Updated 5 min ago) so it reads naturally in the list.
- Back button on new-survey page — If you start creating a survey and change your mind, use the Back button in the top-left of the New Survey page to return to the surveys list without saving.
Importing from Qualtrics#
On the Surveys page, use Import QSF to upload a Qualtrics .qsf file. Intuify maps questions, sections, display logic, survey flow, carry forward, and plugin interfaces into a new draft survey. Review the result in the builder before publishing.
See Qualtrics QSF Import & Export for full import and export steps.
Collaboration#
Use Share on the survey card or toolbar to invite teammates. See Collaboration & Sharing for permissions and live presence.
Related guides#
Was this page helpful?