
Ways to get your survey in front of respondents — the public survey link, distribution channels (links and email lists), QR codes, and embeds.
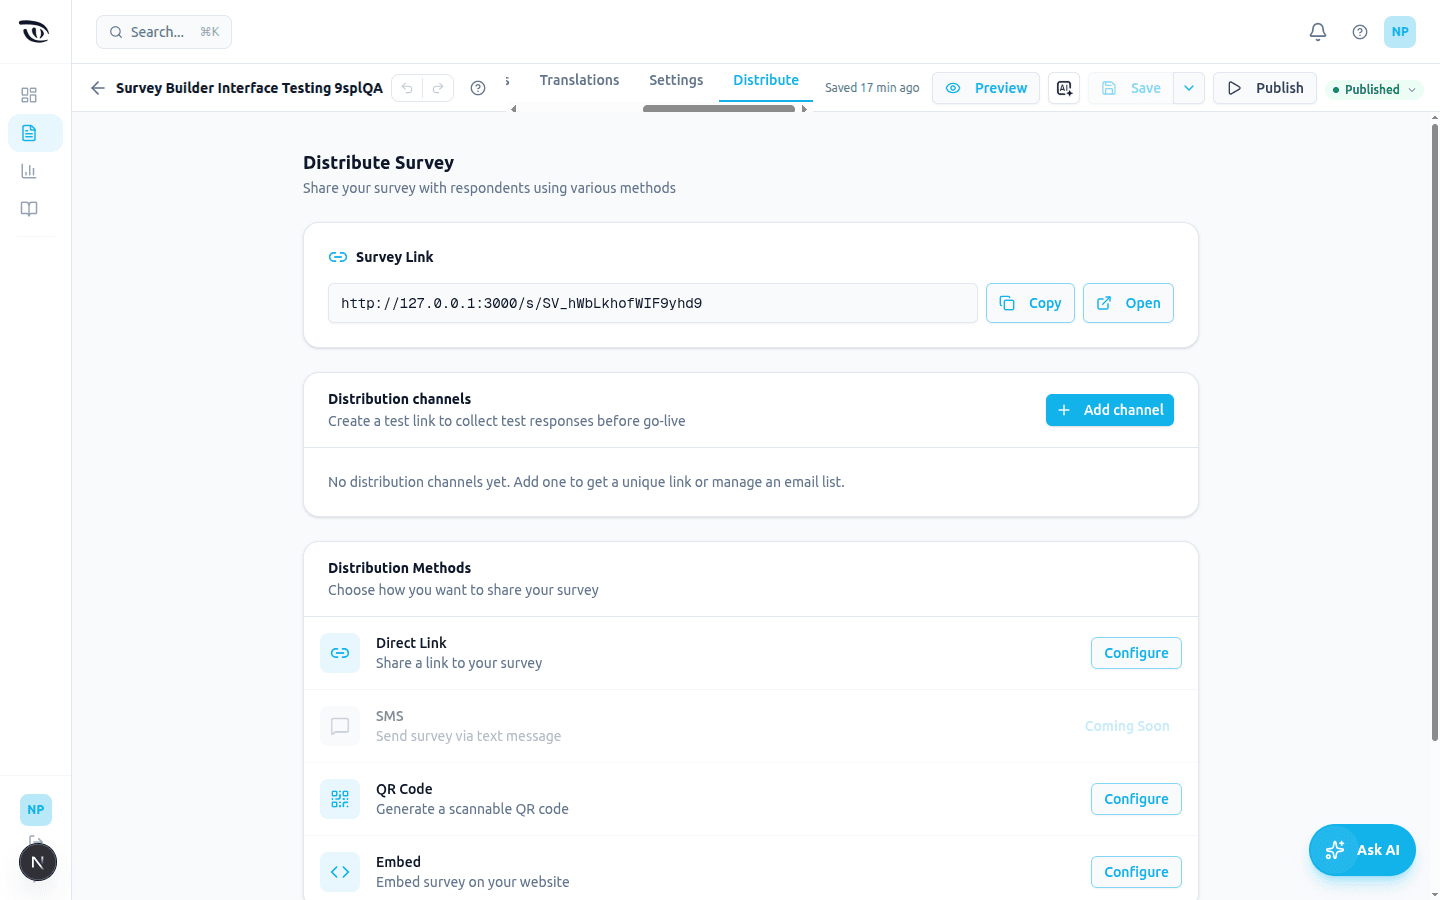
Where to find it: Surveys → open your survey → Distribute tab. The Distribute tab sits in the builder's tab strip in the top toolbar, to the right of Settings — it is the last tab in the strip.
Publish first. Draft surveys are not accessible to respondents. Publish your survey before sharing any link.
Survey link vs. distribution channels#
There are two kinds of links, and they behave differently:
| Link | Where to find it | Responses go to |
|---|---|---|
Survey link — /s/{survey-code} | The Survey Link card at the top of the Distribute tab | Total Responses (your real, live data) |
Distribution channel link — /s/{channel-code} | The Distribution channels list | Test Responses (kept separate; see below) |
Use the survey link for real fielding, and distribution channels to test your survey end-to-end without polluting your live data.
Distribution channels#
Channels let you create extra links (and email lists) for a survey. Open Distribute → Distribution channels → Add channel.
Two channel types:
- Link — generates a unique URL (
/s/{channel-code}) you can copy and share. - Email list — paste recipient email addresses (one per line) when you create the channel; manage them later with Edit list.
Every response collected through a distribution channel is recorded as a test response, kept apart from your real data so you can validate logic, branching, quotas, and the respondent experience before go-live.
Managing channels — each channel row offers:
- Copy the link to the clipboard.
- Rename the channel (pencil icon).
- Delete the channel (trash icon, with a confirmation). Deleting a channel stops its link from working; already-collected responses are kept.
Each row also shows a live response count, which updates as test responses are added, deleted, or restored.
Test responses#
Responses from distribution channels appear under Analytics → Test Responses. Each row has the same actions as the main Total Responses view:
- View — open the full response details (answers, status, metadata).
- Exclude — moves the response to the Excluded tab, where it can be Included again or permanently removed.
Bulk actions are available above the list:
- Exclude all — exclude every test response at once; they stay restorable.
- Purge all — permanently delete all test responses for a clean slate before go-live.
Excluding a test response (single or bulk) decrements its channel's response count and is synced so any mirrored copy is removed downstream. Test responses are excluded from the main Total Responses list but are still counted in the survey's analytics totals until deleted.
QR code#
Generate a QR code from the Distribute tab (Distribution Methods → QR Code → Configure) or the Publish dialog. Download a PNG for print materials, events, or packaging. The QR encodes the survey link.
Embed#
Copy an embed snippet (Distribution Methods → Embed → Configure) to place the survey on a website via an iframe, with adjustable width/height. Ensure your site's content security policy allows the survey origin.
Quick share#
Share the survey link via Email, Slack, Twitter/X, or LinkedIn directly from the Distribute tab without leaving the builder.
Panel redirects#
For panel-integrated studies, configure outcome URLs per termination type (complete, screenout, quota return, quality control). On redirect, the platform automatically appends the panel's URL parameter (for example transaction_id) with the respondent's value — you don't add the key yourself. A leftover blank &transaction_id= is filled with the respondent's value automatically, but a hard-coded non-empty value (e.g. &transaction_id=OLD) is respected and passed through as-is, so don't put a fixed value there. The parameter does not need to be the last one in the URL, and existing query parameters are preserved.
To also capture the panel value onto the response, create a survey variable with Source = URL Parameter. See Variables & Panel Redirects for the full guide to variable sources and capturing transaction_id.
Related guides#
Was this page helpful?